Wednesday 7 September 2016

HobbyBoss's Super Pershing Pilot (Part 4 - Final Reveal)

At long last I have finally completed my Pershing!  As only one of these Super Pershings saw combat at the tail of WWII, my model represents a fictitious version, had the war lasted longer and a few more seen action. The only after-market part is the main gun barrel which I upgraded for a metal version. Overall, an impressive kit which really pushed my skills to the limit, the tracks alone almost driving me to insanity (which may or may not have been my own fault!). What is for certain is, I will buy more HobbyBoss kits!


Monday 9 May 2016

1/35 Trumpeter's - E100 Heavy Tank (Part 1)

Having used the last of my primer and waiting for my eBay order of paint to arrive, all current projects are on hold. So, feeling bored I excitedly grabbed another kit from my stash - the E100 Super Heavy Tank!
Beautiful artwork..........Okay, so the word 'beautiful' hardly fits such a scene of destruction but you have to admit, the art does a fabulous job of selling the kit and making Paper Panzer enthusiasts want to built it.  
Photo above for reference purposes only.
This kit is based partly on reality, at least the lower hull existed anyway.
There are lots of road wheels to clean so it took me two boring sessions to get them sanded and cleaned to my satisfaction. 
Photo etch grilles are included with the kit - nice!   
With a 1/35 tanker standing in the hull we can get an idea of this beast's size.
Photo above for reference purposes only.
In the reference photo above we can see the hull minus track guards - I may or may not have them installed on my kit. 
And with the turret (which I believe is fictional) loosely placed on the hull we can see how she'll look a little later.  In the background is one of two attractive colour schemes supplied by Trumpeter. I will probably use a scheme of my own.

Friday 6 May 2016

1/35 - Tamiya 251/9 Kanonenwagon (Part 1)

As if I didn't have enough builds going on right now, I decided to of course embark on a new project. This is a very common habit among modelers, and I'm sure anyone reading this knows exactly what I mean. 

Anyway, this time I plan on building an abandoned 251 half-track and a base to accompany the machine - the 251 will be depicted as though it was either rammed or purposely driven off the road and down a steep embankment where it will sit at an angle of approx. 50 degrees.
Being affordable (and even more so being in the spring sale), the 1/35 Tamiya kit was my choice, after all, if I ruined the model it wouldn't matter too much. However, this hopefully won't happen so I look forward to bringing my vision to life.......... ;)
I was pleased to find the front suspension was workable and the wheels could be turned - this saves me some work as I will need this option.
The interior isn't too bad at all and is perfectly acceptable for my purposes - I am interested in building an interesting scene, not a 100% scale replica. 
Click on photo for larger image.

Above is a quick 'thinking-out-loud' of what I intend to work on - this certainly has the makings of a fun project and I'm quite excited by the prospect of attacking the 251 with my 
airbrush. I have already started building the base so if you want to see more please feel free to check-in again some time.

Friday 15 April 2016

Tamiya's 1/35 Jagdpanther (part 5 & the final reveal)

At last my Jagdpanther has been completed! She is depicted as partially-assembled and abandoned due to a lack of fuel; she sits among rubble in the grounds of a bombed-out factory where she herself was built and which her crew were ordered to guard.  The inspiration for this build came from a WWII photo of a similar scene.  And so, without further delay, here are the photos!


See part 4: 'HERE'

Sunday 21 February 2016

Tamiya's 1/35 Jagdpanther (part 4)

The base coat is finally applied to my late-war Jagdpanther and as you can see my black & white shading has been partially lost due to not thinning the paint sufficiently - it's there, just not visible unless the model is sitting right in front of you.  Not to worry though, I'm still very happy with the way she looks thus far.  After a coat of satin varnish I gave her a pin-wash using oil paints, sealed and then couldn't resist some light chipping in applicable areas.


To create the graduated paintwork on the hull I utilized two shades of 'AMMO's late-war Dunkelgelb and also an attractive shade of green (RAL 6011). The red oxide is represented by using Vallejo Model Color Cavalry Brown; I didn't want to over-do this colour so chose only small areas to add a 'warmer' area of interest to the model's otherwise minimalist hull.


I am currently figuring out where I want to go with her next as there are several ideas floating around in my mind.  Throughout the build I've resisted the temptation to add any tools or accessories, so therefore stuck to my own brief of a partially-completed (just running and armed) machine taken directly from the production line. 


Anyway, there will be more soon, comrades!

See Part 3 HERE

Sunday 14 February 2016

Tamiya's 1/35 Jagdpanther (part 3)

My Tamiya Jagdpanther is back on the bench once again; in the photos below you can see I am trying the black and white method of modulation which seems very popular at the moment.  With this method I'm striving to create artificial lighting effects and although maybe not the most realistic method, to my eyes models that others have finished in this manner look fantastic!  

Okay, so in the photo above you we have a very basic hull minus the tools and any other accessories you might expect to find on a late-war Jagdpanther; in case you haven't read my previous post regarding this build, my machine is going to have been rushed out of the factory, and for inspiration I used WWII photos of actual machines in and outside a Jagdpanther factory.


The paint job was actually a lot of fun (little did I know much of this hard work was to be in vain, but more of that later......) and I'll definitely be using this method again, albeit with more attention when it comes to adding a base coat! 


For the paintwork I simply used Vallejo Air black and white built up in thin layers; I want the light areas to be on all the exposed horizontal surfaces while sloping verticals can be graduated into the black.


Sadly much of my hard work in these photos was lost when I failed to sufficiently thin my base coat, which is surprising considering I was working with such intense concentration - you know how sometimes when trying to sign your best signature, you some how end up spelling your own bloody name wrong? No?  Well, that's what happened here, I'm sure.................


In the photo above you can see a few modifications I made.  WWII factory photos show partially assembled Jagpanthers already adorned in their dunkelgelb  base-coats, yet their stowage bins to the rear are missing although the brackets to which they would affix are present and apparently coated in red-oxide primer - I have recreated this detail.  I also used plastic card as a tiny back-plate to hold the fire extinguisher to the rear of the upper hull instead of the hull's side.


Weld marks were created using putty and brass wire represents my Notek light's conduit.


Not sure if I'll use the side skirts; they've been thinned down using a sanding stick and the then pliable plastic bent on the corners to represent wear and tear.


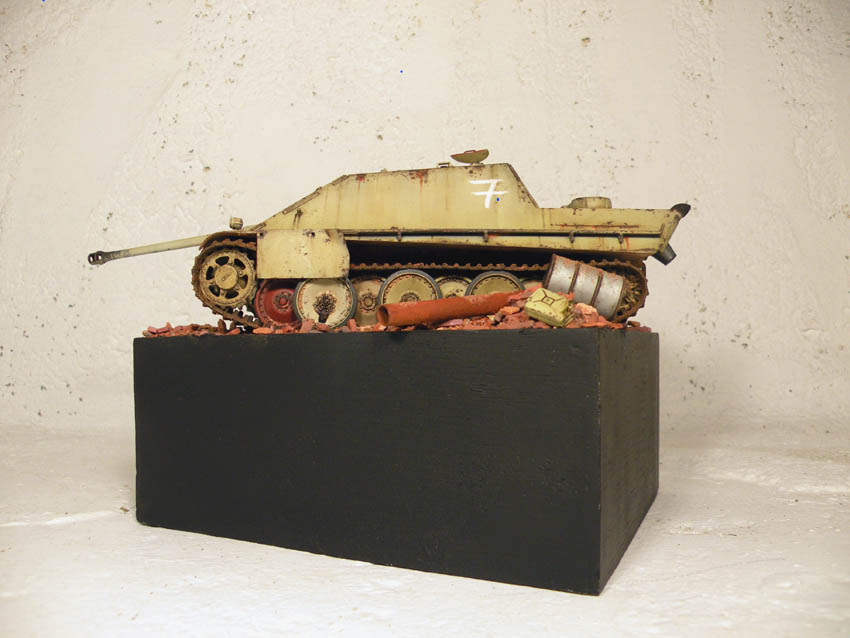
And above you can see I have my complete model ready for it's base coat. Had I thinned the dunkelgelb paints I would have had a spectacular hull (at least to my eyes, and who elses' are more important on a model built solely for my own cabinet) so the fact I didn't thin my paint frustrates the crap out of me. It's not all bad news though, some of the shading did remain and I'll still endeavour to build my best model to date.

More soon...................

See part 2 HERE
See part 1 HERE